How do I configure a SmartPhone?
|
Create an account. You'll then receive details that you'll need to set up your account on your Smartphone. Then, looking at the Smartphone, follow these instructions:
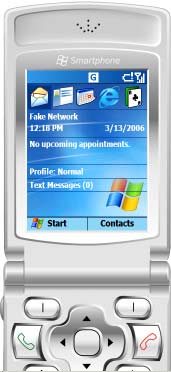
- Press the [Start] button (Picture1).
- Select '1 Messaging' option (Picture2).
|
Picture 1
|
Picture 2
|
- Select '3 Outlook E-mail' option (Picture3).
- Select [Menu] (Picture4).
|
Picture 3

|
Picture 4
|
- Select ' 8 Options' from the 'Menu' list (Picture5)
- Select '5 Account Setup' from the 'Options' list (Picture6)
|
Picture 5
|
Picture 6
|
- Select '3 Outlook Email' from the 'Account Setup' list (Picture7)
- Select [Menu]
- Select '1 New' option from the 'Menu' list (Picture8)
|
Picture 7
|
Picture 8
|
- Enter your name in the 'Your name' field; enter your e-mail address in the 'Email Address' field, select [Next] option. (Picture9, 10)
|
Picture 9
|
Picture 10
|
- Enter your POP3 user name in the 'User Name:' field, move the cursor below, enter your POP3 account password in the 'Password:' field , select whether to save the password or not, and press [Next] (Picture11)
Note: In most cases, the POP3 user name and password are not equal to the SMTP User Name and SMTP Password.
- Select 'POP3' as the 'Server type:', move the cursor below, enter the 'Account name' you want to be displayed in the list of SmartPhone accounts, move the cursor below and select the type of 'Network' connection from the list of available options (The Internet, MMS Network, Secure WAP Network, WAP Network, Work, etc.). (Picture12)
Make sure that this connection is properly configured in the SmartPhone settings and is available for use, otherwise your e-mail messaging will fail.
|
Picture 11
|
Picture 12
|
- Enter your POP3 server name in the ''Incoming Server' field, move the cursor below and type smtp-server.com in the 'Outgoing Server' field. Check the box 'Outgoing Server requires authentication'. (Picture13)
- Select 'Outgoing Server Settings' (Picture14)
|
Picture 13
|
Picture 14
|
- If your POP3 account and SMTP accounts have different passwords, check the box ''Use different password for outgoing server'. (Picture15)
- Move the cursor below and enter your SMTP User Name in the 'User name' field. Move the cursor below and enter your SMTP Password in the 'Password' field.
- Scroll down the screen; check the 'Save Password' and 'Require SSL when connecting to this server' options. This setting is highly recommended. It makes your entire email session, including your login, encrypted and secure. Select [Done] to complete the setup. (Picture16)
|
Picture 15
|
Picture 16
|
- Select [Next] to configure other e-mail options. (Picture17)
- Configure other e-mail options and select [Next] (Picture18)
|
Picture 17
|
Picture 18
|
- Select [Finish] to complete a new e-mail account configuration. (Picture19)
Congratulations! You've just completed your POP3 and Secure SMTP account configuration. Now you are ready to send/receive e-mail messages, select 'Send/Receive' from the 'Menu' options to begin using e-mail.
|
Picture 19

|
|